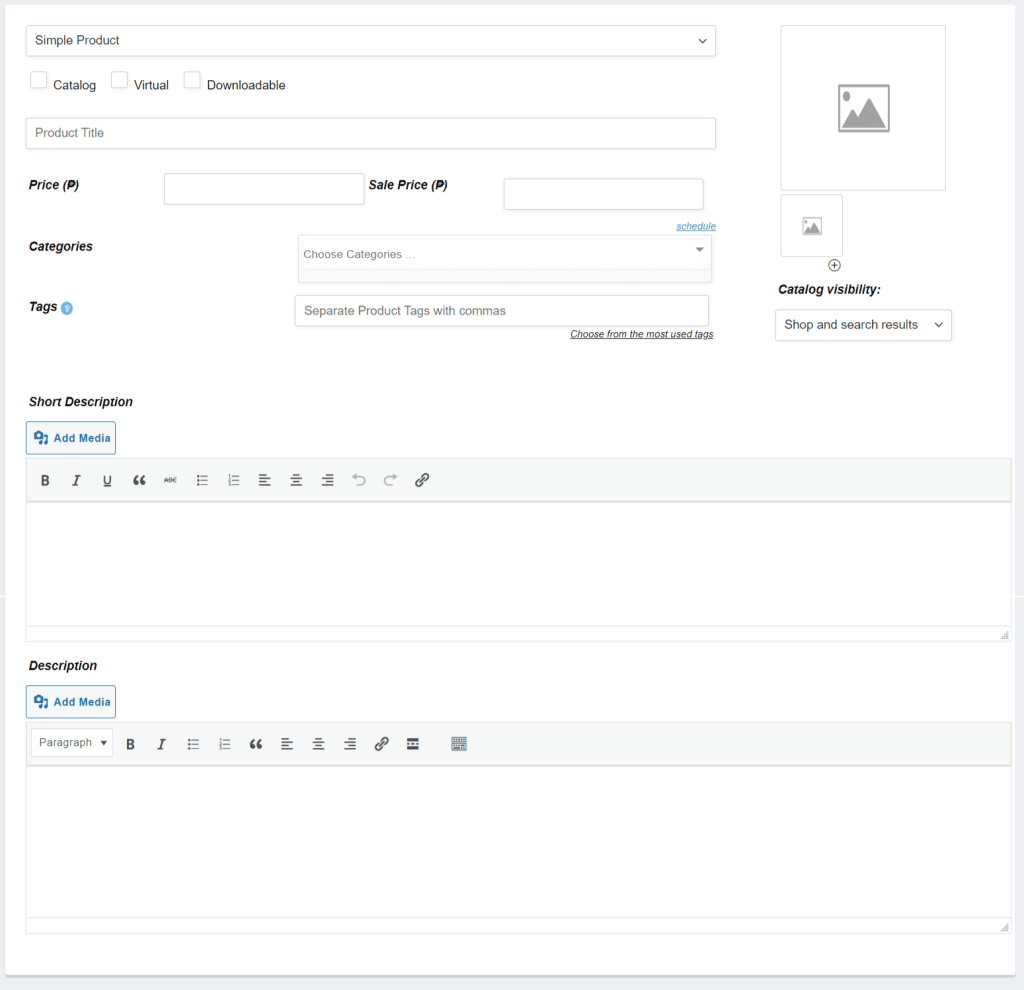
Add New Products
To add new products, the most common pieces of information about a product are the title, price, and description. Sale price is optional. Even discounts for a set period of time might be planned. For your product, you can choose a start date and an end date to automatically apply discounts.
Additional Info
Categories – are the primary way to group products with similar features.
Tags – are another way to relate products to each other, next to product categories.
Catalog Visibility
- Shop and search – Visible everywhere, shop pages, category pages and search results.
- Shop only – Visible in shop pages and category pages, but not search results.
- Search only – Visible in search results, but not in the shop page or category pages.
- Hidden – Only visible on the single product page – not on any other pages.
Simple Product
Simple – covers the vast majority of any products you may sell. Simple products are shipped and have no options. For example, a book. To navigate on my account, go to Store Dashboard > Products > Click Add New > Select Simple Product. Please watch the video tutorial below.
Additional Info
Please mouse over the “blue question mark” beside the label names to see each use.
Inventory – allows you to manage stock for each product individually, as well as decide whether to allow back orders and other options. It allows you to sell products and allow customers to add them to their shopping cart to purchase them.
Shipping – before selecting your shipping options, please check Shipping tutorial under “Setting up a store” to ensure that you set it up properly.
Tax – This option determines how prices are displayed in your shop/catalog.
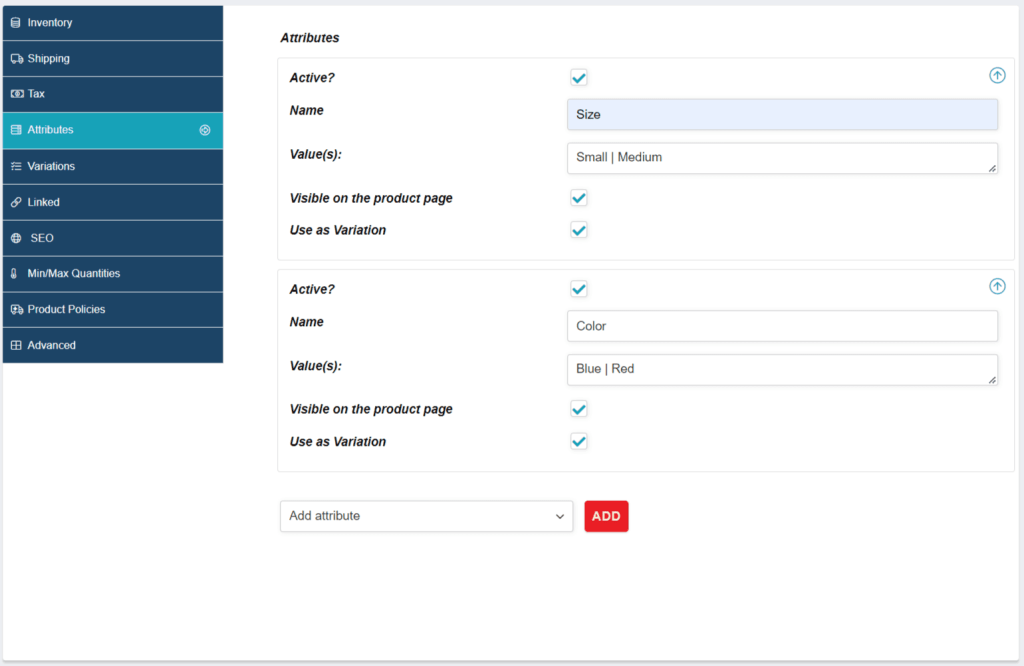
Attributes – an important way to group products is to use attributes. In order to create a variable product, an attribute for the product must first be defined. These attributes can then be used to differentiate between different variations.
For example, if you’re selling clothing, two logical attributes are “color” and “size”, so people can choose color that fits their style and type and clothing available in their size.
Linked – using up-sells and cross-sells, you can cross promote your products. They can be added by searching for a particular product and selecting the product from the dropdown list.
SEO – to make your product visible in web searches.
Min/Max Quantities – allows you to set minimum/maximum thresholds and multiple/group amounts per product, as well as variations, to limit the number of items that can be purchased.
Product Policies – there are Product Policies that can be set up for specific products in addition to Store Policies. To avoid penalties, however, be sure to follow A-buy guidelines before establishing your own Product Policies.
Advanced
- Purchase note – enter an optional note to send the customer after they purchase the product.
Variable Product
Variable – a product that allows you to offer a set of variations on a product, each with its own price, stock, image, and other options. They can be used for a product such as a shirt, where you can offer small, medium, and large sizes in a variety of colors. To navigate on my account, go to Store Dashboard > Products > Click Add New > Select Variable Product. Please watch the video tutorial below.
Additional Info
Attributes
To add a new attribute specific to this product:
- On the Attributes Tab, select Add Attribute then click Add.
- Enable the Active checkbox for the added attributes
- Name the attribute (e.g., Size).
- Set values separated by a vertical pipe, |(e.g., Small | Medium | Large).
- Enable the Visible on the Product Page checkbox.
- Enable the Used for variations checkbox.
Variations
To create a possible combination of variations from your attributes and their values, on Variations Bulk Options you may select Create variations from all attributes.
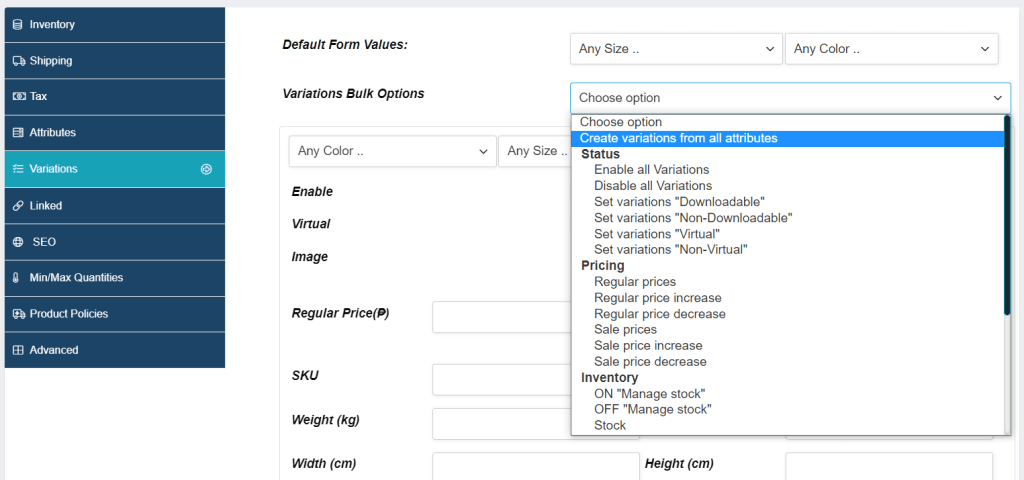
For example, if you have two attributes – size (with values small and medium) and color (with values blue and red) it creates the following variations:
- Blue Small
- Red Small
- Blue Medium
- Red Medium
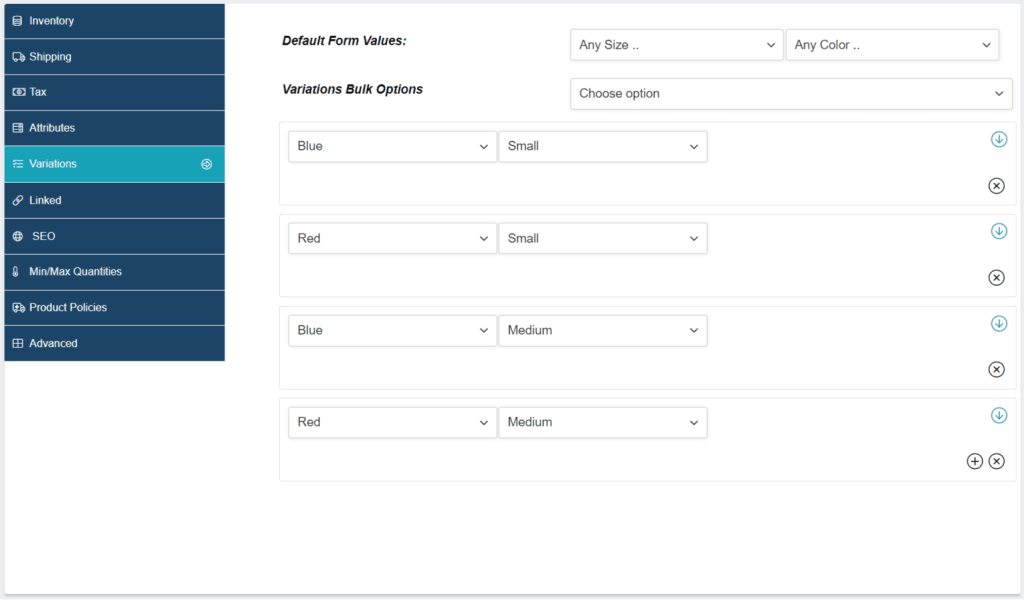
Each variation can have the following properties.
General
- Enabled – Enable or disable the variation.
- Downloadable – If this a downloadable variation.
- Virtual – If this product isn’t physical or shipped, shipping settings are removed.
- Regular Price (required) – Set the price for this variation.
- Sale Price (optional) – Set a price for this variation when on sale.
- Tax status – Taxable, shipping only, none.
- Tax class – Tax class for this variation. Useful if you are offering variations spanning different tax bands.
- Stock quantity – Shows if Manage stock? is selected. Allows to set the current stock level for the variation.
- Allow backorders? – Shows if Manage stock? is selected. Allows to set if backorders are allowed for the variation; if enabled, stock can go below zero.
- Low stock threshold – Shows if Manage stock? is selected. When the stock for the variation reaches this level you will get a notification email. If not set, the product-wide threshold will be used.
- Downloadable Files – Shows if Downloadable is selected. Add file(s) for customers to download.
- Download Limit – Shows if Downloadable is selected. Set how many times a customer can download the file(s). Leave blank for unlimited.
- Download Expiry – Shows if Downloadable is selected. Set the number of days before a download expires after purchase.
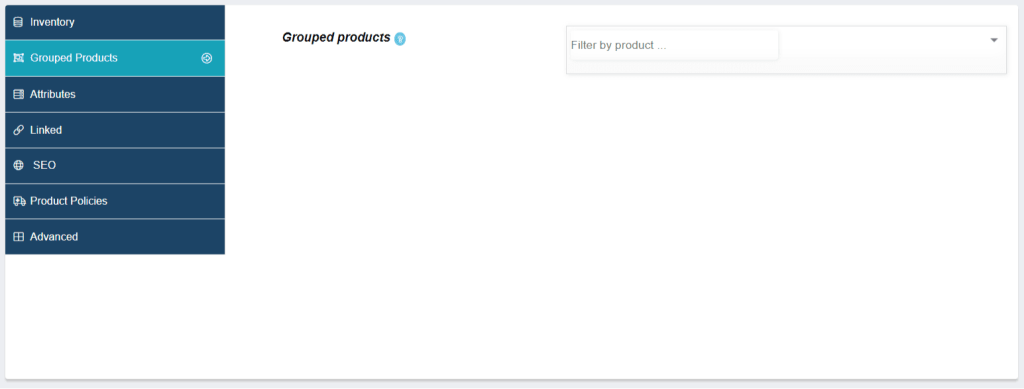
Grouped Product
Grouped – a collection of related products that can be purchased individually and only consist of simple products. For example, a set of six drinking glasses. To navigate on my account, go to Store Dashboard > Products > Click Add New > Select Grouped Product. Please watch the video tutorial below.
Additional Info
Once you’ve finished creating simple products, you can select them from the drop-down menu for Grouped products.

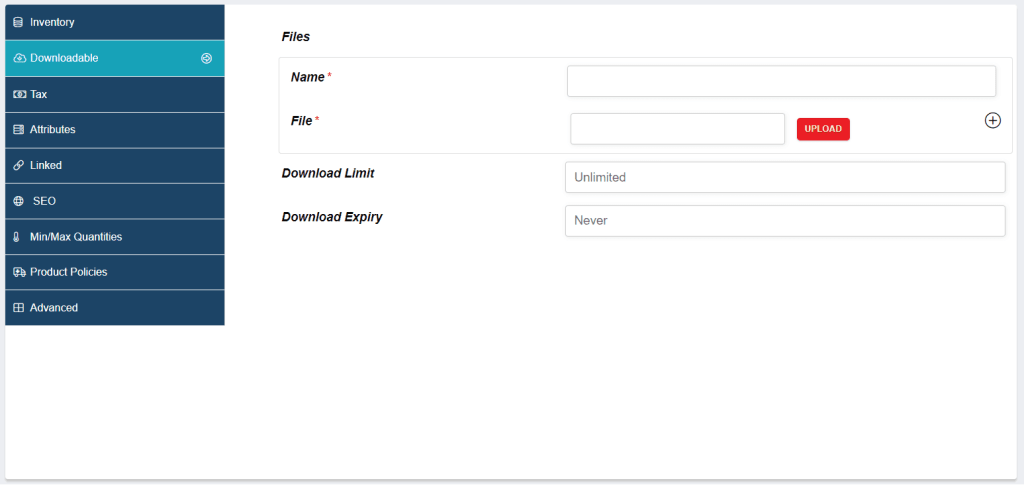
Downloadable
When adding a simple product, you can select the Downloadable checkbox box in the product type panel. This adds four new fields:
- Name – name of the file that your customer can download and buy from your store.
- File path – path or URL to your downloadable file.
- Download limit – limit on number of times the customer can download file. Left blank for unlimited downloads.
- Download expiry – days the download link will be available.
For maximum flexibility, downloadable products also incur a shipping cost (if, for example, you were offering both a packaged and a downloadable version of a product, this would be ideal). You can also check the Virtual box if the downloadable product is not shippable.
Import Products
To import new products or update existing products, you need a CSV containing your product information.
Images
- Images need to be pre-uploaded or available online to import to your store.
- You can define the filename if the image already exists in the Media Library.
- Select Products Import at the top. The Upload CSV File screen displays
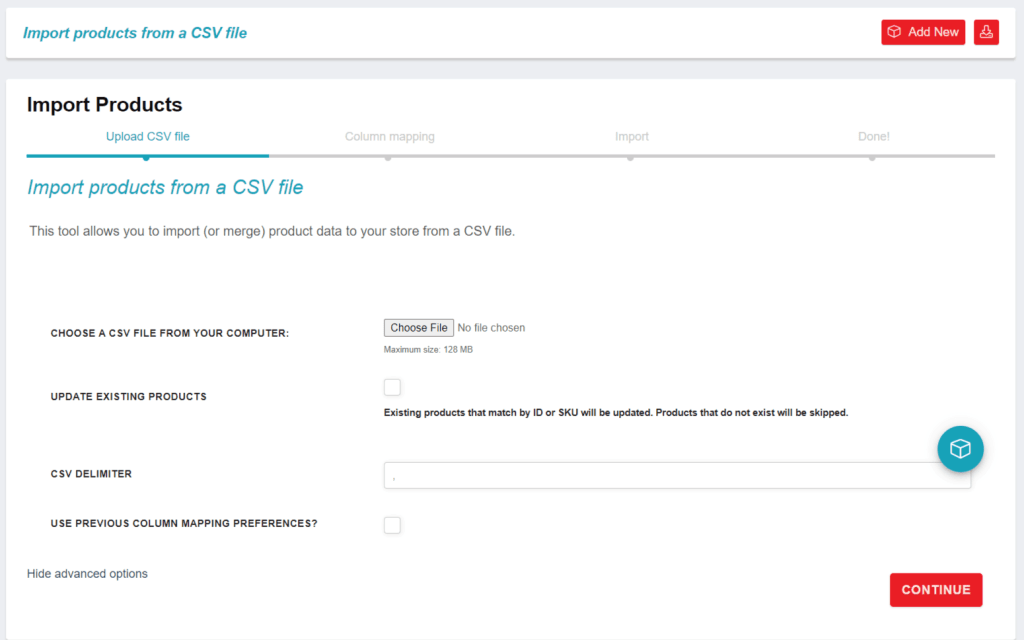
2. Select Choose File and the CSV you wish you use.
3. Tick the checkbox for Update Existing Products. (If you want to update existing products with new info.)
CSV delimiter (Advanced option): Generally, CSV elements are separated by a comma. If you are using a different delimiter in your file, you can set it here.
4. The Column Mapping screen displays, and it will automatically attempts to match or “map” the Column Name from your CSV to Fields.
5. Use dropdown menus on the right side to adjust fields or indicate ‘Do not import.’
**Any unrecognized columns will not be imported by default.**
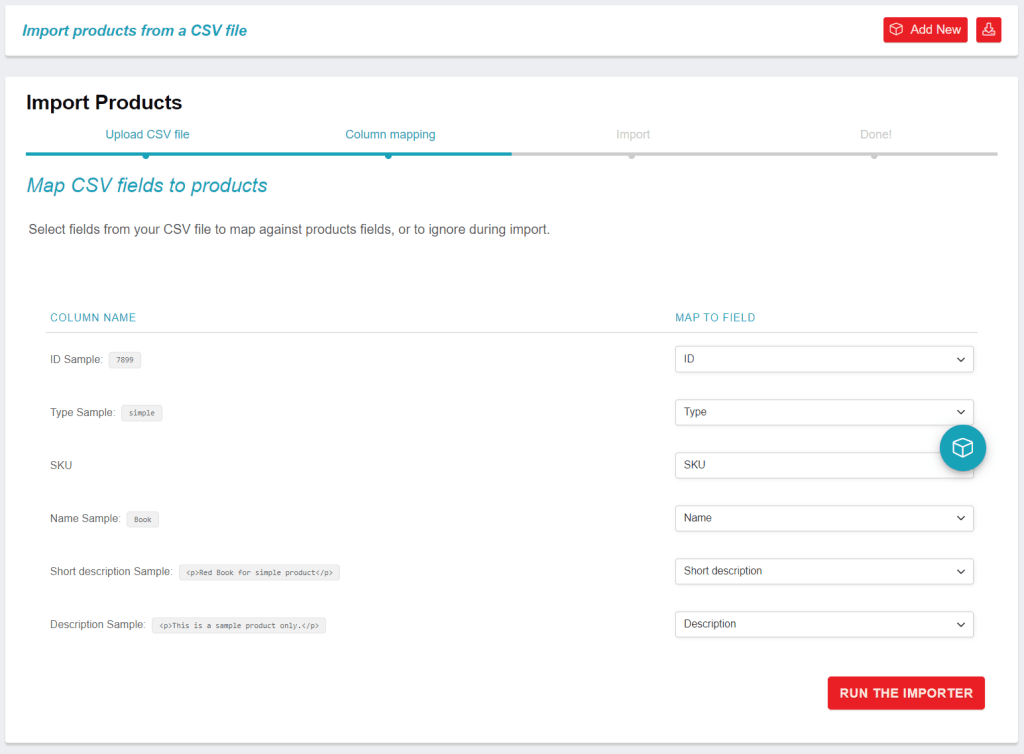
6. Select Run the Importer.
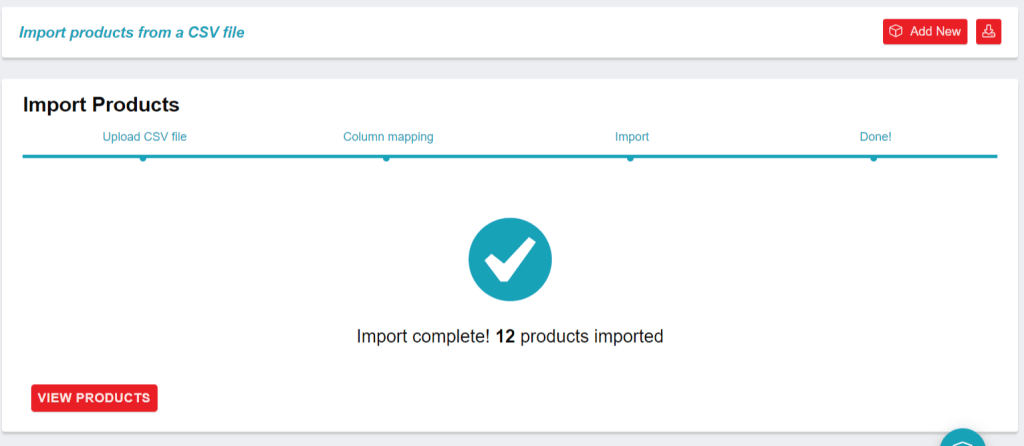
7. Wait until the Importer is finished. Do not refresh or touch the browser while in progress.
Export Products
To export their current catalog of products for any reason can generate a CSV using the Product Exporter.
- Select Export at the top. The Export Products screen displays.
- Select to Export All Columns. Or select which columns to export by using the dropdown menu.
- Select to Export All Products. Or select which product types to export by using the dropdown menu.
- Tick the box to Export Custom Meta, if you need this info.
Meta data columns are exported following the meta: -prefix standard detailed above in the importer mapping section. By default, no additional meta data is exported.
- Select Generate CSV. Wait for the export to finish
**Only products with a status of ‘publish’ or ‘private’ were exported, not those in ‘draft.’ **

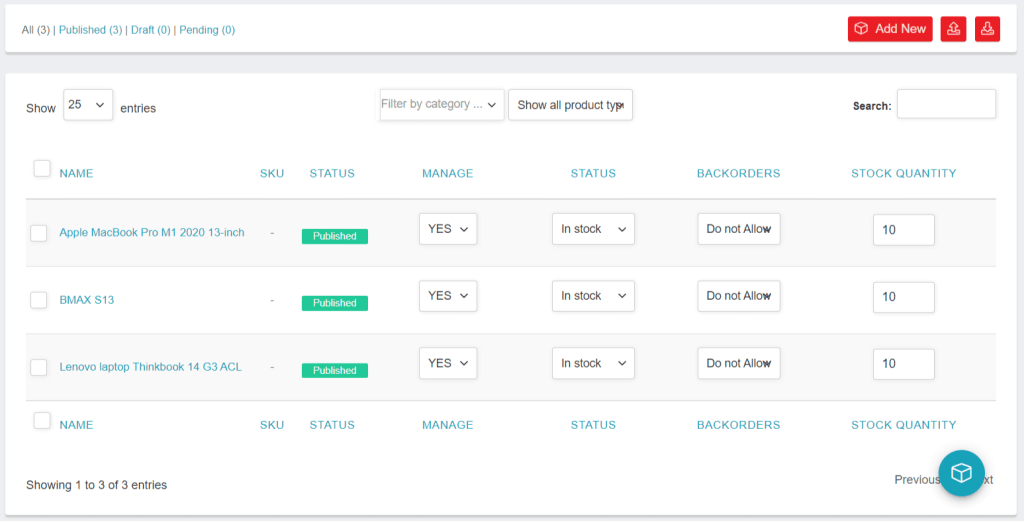
Stock Manager
Sellers can edit and update all of their products in a single interface, allowing you to manage all of your products with a single click.
Manage – If YES is selected, you can change the stock quantity, else changing it is not allowed.
Status – you can choose whether the product is out of stock or in stock.
Backorders – you can manage if they want to permit backorder for the products
Stock Quantity – If manage stock is set as “Yes”, the you can set stock quantity for here